

Stage 1: Model preparation
Stage 2: Mounting models for painting
Stage 3: Base-coating
Stage 4: Camouflage
Stage 5: Bringing out the detail
Stage 6: Markings
Stage 7: Protecting the paintwork
Stage 8: Basing
In micro scale, group-basing of infantry is essential; they're far too small and fiddly to use individually. All of the rule sets I've seen for microarmour gaming recognise this fact and expect infantry to be based in small units, usually section or half-section strength. Some rules also expect vehicles to be based, but for aesthetic reasons I prefer not to base them if I can get away with not doing it.
The rules I prefer for microarmour are WRG's set, All-Arms Land Warfare 1925—1950 (2nd Ed.) in which basing preferences are left up to the individual, though some guidelines are given. I've set the base sizes and populations according to the Flames of War rules so that I can use the models for that as well, though I've translated the sizes using centimetres where FOW decrees inches.
My basing system is governed mainly around ease of storage and transport of the models, and is designed to take advantage of magnets to keep the models firmly in place.
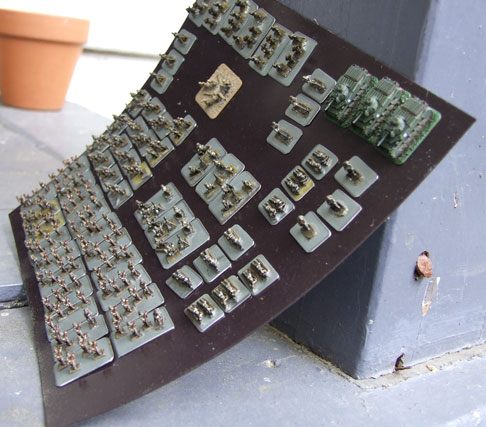
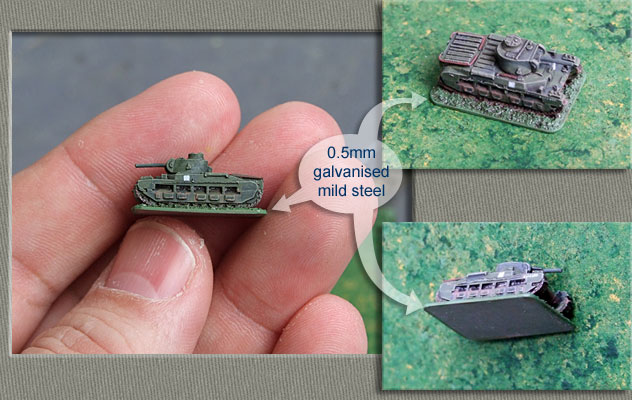
The base material I use is 0.5mm galvanised mild steel, which is easily cut to size with a pair of tin-snips and soft enough to flatten out afterwards with pliers. The steel sticks quite firmly to the flexible magnetic sheet of the sort used for fridge magnets and signs stuck to car-doors and the like; in the image here to the right you can see a bunch of figures happily not sliding off a piece of the stuff.
I sourced the magnetic sheet from a local signwriter, and it was relatively cheap: about $20 for a square metre, which is enough to store a large quantity of microarmour. The piece shown here is only about 15cm square.
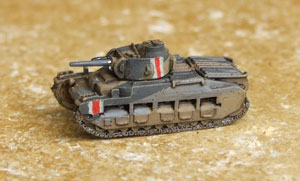
As I mentioned above, I normally only base infantry and guns, but here you can see a troop of BEF Matildas based just like the infantry.

Basing is pretty straightforward. The steel sheet is cut to size with a standard pair of tin-snips. NOTE: make sure the snips you use aren't the type with serrated jaws; you want the cuts to be as clean as possible or else the bases will be difficult to move easily on the wargames table.
The snips tend to leave the pieces curved, but they are easily flattened out again by squashing them in the jaws of a pair of pliers. Then the corners are rounded off by dragging them a couple of times against a fine flat file; this helps to keep the bases from snagging when they're being moved around during a game.
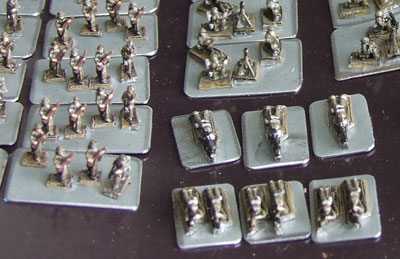
Once cut to size, I glue the guns and/or infantry to them. For rifle teams I mount about four figures to a 25mm wide base; more than that is too crowded unless you're making bases for Chinese or Soviet "human wave" charges. Three is OK, but looks a little sparse. (25mm is a 50 metre frontage for the WRG rules)
The figures shown here are Heroics & Ros British infantry; I'd like to get some of GHQ's individual infantry and try them out, but that will have to wait for a while until I make a bit of money.

The bases are then painted in roughly the same colour as the usual playing surface. Once dry, I paint on PVA glue and sprinkle it with some very fine sand — some ground-up pumice stone — and leave it to dry thoroughly. Then the rough surface is painted and dry-brushed, which blends it into the overall base and ensures that you get a consistent colour and style throughout your army. The base shown here to the left is a 6pdr anti-tank gun in the Western Desert; the base has been glued and sprinkled with sand, but hasn't yet been painted and dry-brushed. You can see that the ground pumice dust I use has a fairly neutral grey tone, left to its own texture.
The MDF sawdust used for grass bases (see below) works pretty well as sand and dust too, and you don't even have to dye it.
When MDF (medium-density fibreboard) is sawed, it pretty much just disintegrates into very fine dust and fibres. I mix the sawdust with watered-down acryilic paint, adding the sawdust to the paint and stirring it until it won't easily absorb any more dust. The resulting paste is smoothed out on baking paper to dry for a couple of days, then broken up and rubbed and pushed through a strainer.
NOTE: the MDF will lighten the paint colour, so you'll need to allow for that when you mix your colours.
It's really easy to make flock this way, but I'd recommend you start with fairly small quantities to get the hang of it before trying to make enough to cover a football field.
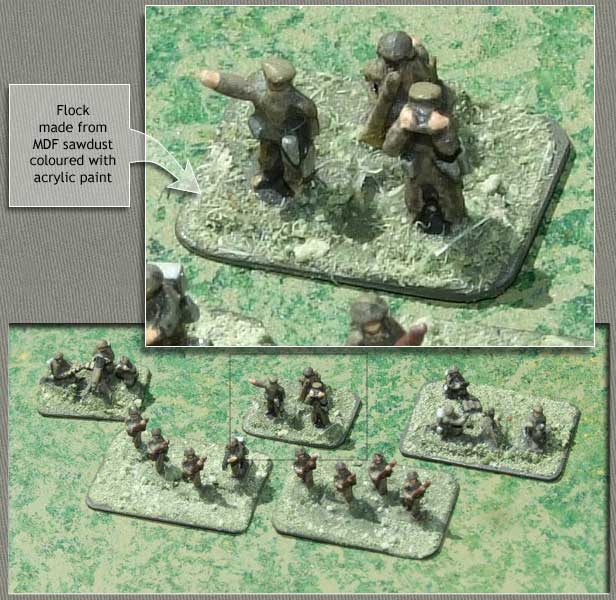
For grassy bases I use a slightly different approach. The bases are first painted in a dark greenish brown enamel (Tamiya XF51 Khaki Drab) — I use enamel because it will go on over bare flat metal surfaces without any risk of beading, and it dries harder than acrylic.
Once the paint is dry, I paint the base around the figures with undiluted PVA glue and then dip the whole shebang in a very fine home-made flock made from MDF sawdust.
The resulting flock, as you can see in the images to the right, is slightly granular and fibrous, and the PVA darkens it irregularly.
Once the glue is completely dry, I lightly brush or blow off any excess and then give it a coat of matt enamel varnish to seal it and prevent any loose bits from falling off.
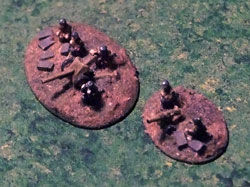
I don't go in for highly detailed diorama bases for a couple of reasons: first, because they gather dust and are difficult to clean, and second because I think they're mostly a waste of time for gaming pieces. However, I will sometimes add some little touches to give the bases some individuality. On these bases (some fallschirmjäger with a PaK36 and a Püppchen) I've added a scattering of plasticard oblongs to represent ammo cases.
These bases were textured with a scattering of dried mixed herbs from the supermarket, ground reasonably fine. They included some little stalks that helped to give some variation to the ground cover, and I think they worked well. However, over the years they've changed colour a lot — they were originally a vaguely khaki green, and they're now quite brown.
By the way, I don't recommend trying oval bases as I have here. I think they look good, but they're a huge pain to cut out. If I could get them done cheaply en masse by laser cutting or something, I'd go for it, but definitely not if I have to cut them by hand.
As I mentioned before, I'm not really in favour of basing vehicles. Bases can look quite out of place if put against unmatching terrain — a Panzer IV advancing down a road surrounded by its own personal little garden just looks wrong.
However, I have based a few vehicles, and the process is basically exactly the same as for infantry.
The image to the right shows one of the BEF Matildas shown earlier on the flexible magnetic sheet. The base is cut to size so that only a millimetre or so shows all around the vehicle. I did try to cut bases exactly to size to avoid the "garden" problem I mentioned above, but they looked as though I was trying to hide them — which, of course, I was. Anyway, it didn't look any good, so I went for an obvious but not overwhelming base size, as shown here.
Texturing and painting the bases is exactly the same as for infantry and guns.
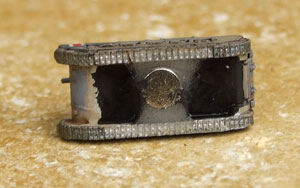
The way that I prefer to deal with storing and transporting vehicle models is by gluing tiny rare-earth magnets to their undersides. The storage trays have a sheet of very thin steel sheet glued to their floor, and the tanks sit quite securely on that, held firmly in place by the magnets.
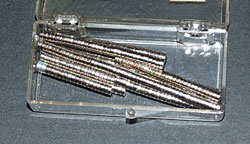
These magnets are surprisingly powerful for their size. They are available from a number of suppliers, but I got these ones out of some cheap Chinese magnetic construction sets at the local supermarket. The sets were going for a dollar or so each, and each one yielded between 15 and 40 magnets.
The magnets shown here are 4mm in diameter and about 1.5mm thick, but they're available in quite a range of sizes — I think the smallest ones are as tiny as 1/64th of an inch diameter.
To ensure that the magnets were kept at ground-level (to maximize their sticking power), I glued them in place in the folowing manner:
Some of the larger tanks, that ride higher on their treads than the Matilda shown here, may need a spacer glued between the magnet and the hull, or else have the magnet stuck in place with epoxy putty instead of glue.
The only disadvantage to using magnets in this way is that can sometimes be seen when the vehicle is on the table. It's not a big problem for fully-tracked vehicles, and a touch of matt black paint ensures that the shiny magnets don't reflect any stray light. However, for other vehicles like trucks or jeeps, it may be better to base them like infantry if you can't bear the idea of filling up the space under the chassis.
Another reason to have magnets glued to the underside of vehicles is that it simplifies the use of dust markers to represent the plume of dust created by a vehicle moving fast across desert terrain. I show how I make the dust and smoke markers here. It could also be useful in allowing one to add things like dozer blades, mine flails or Cullin hedgerow cutters without requiring a dedicated tank model for each specialist equipment type, but I haven't yet tried that out.