

Stage 1: Model preparation
Stage 2: Mounting models for painting
Stage 3: Base-coating
Stage 4: Camouflage
Stage 5: Bringing out the detail
Stage 6: Markings
Stage 7: Protecting the paintwork
Stage 8: Basing
No matter how good your base coat is, and pretty much regardless of the colour (though some are worse than others) microarmour resolve into shapeless blobs at anything much more than arm's length. If the models have a camouflage pattern painted on as well, the problem is exacerbated — which you'd expect; after all, that's what camouflage is actually for.
The problem is that no matter how detailed they may be, the size of the models means that they can't develop enough shadow and highlight contrast under normal lighting conditions to make the elements of their form stand out. We have to give them a helping hand, by exaggerating their highlights with a lighter tone and their shadows with a darker one.
The quickest and easiest way to pick out and enhance surface detail is with dry-brushing. With this technique, a brush is loaded with a light-toned paint (usually the base colour with some white added) and then almost all of the paint is drained out of the bristles. I use a paper towel for this, and brush against it until virtually no pigment is being left behind with each stroke.
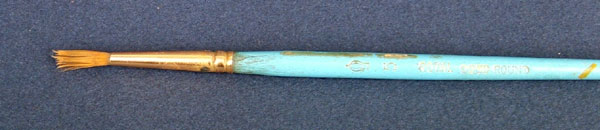
The brush I use almost exclusively is this worn-out old synthetic. It was a good brush in its day, but it's had a pretty hard life and its point is now completely gone. However, its bristles are both fine and springy, and the paint drains out easily: all essential qualities desired in a dry-brush. Its only fault is that it's quite large (about a number 5, I think) so it's not so good for fixing up small localized areas.
The most common error people make when dry-brushing is to leave too much paint in the brush. The paint should be "dusted" on to the model; if you're getting streaks or smears, there's too much paint in there and you need to get some more out on the paper towel.
Don't try to get too heavy an effect all at once. It's much better to do several dry-brush coats; too much paint at once will just give you a streaky semi-wet brush effect and won't just accentuate the highlights as we want.
Stroke the model back and forth all over with the tip of the brush, and the highlights will begin to appear.
For tiny models like microarmour, you'll probably find you'll want a lighter tone than you'd use for larger scale models. Bigger models are more able to create their own highlights and shadows, and don't need as much artificial help.
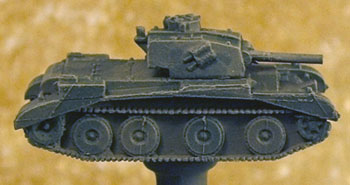
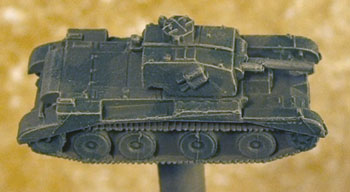
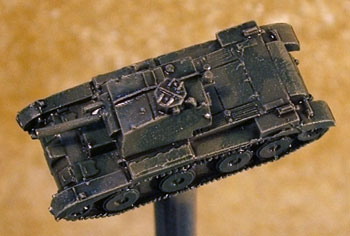
In the images to the left, you can see that all the edges have been outlined in the pale highlight tone. The dry-brushing has also found out and enhanced some mould-lines that I missed when I was preparing the modls for painting — remember how I said that was important? This is why.
Once upon a time I would have stopped at this point, but these days I add an extra step that really helps to show off the model's detail — an ink-wash.
Painting the tracks and road-wheels on microarmour is my least favourite part of the process for some reason, and I keep trying to convince myself that I don't really need to worry about it. But the sad truth is that the models just look a whole lot better if you do. The colours you use for the tracks of a tank depend mostly on the assumed environment.
AFV tracks in dry desert environments tend to be relatively bright as they don't rust as badly as those in wetter climes and are constantly being abraded by the terrain. They pick up a lot of dust, but the metal does show through. I use a base gunmetal grey, with a very little (very little) dry-brushing in aluminium paint to pick out the track pattern, assuming the model is finely enough detailed to make that worth while.
In more humid climates, tank tracks get both rusty and muddy very fast. For those tracks I use a red-brown base which will be darkened and detailed by the ink-washing stage (see below).
The road-wheels of most tanks (though not all) have rubber tyres, and trucks and half-tracks have pneumatic rubber tyres. I find these are best painted a darkish grey rather than black; a pure black looks too stark. Some tank and half-track tracks also have rubber pads on their tracks, but I've never bothered painting in that level of detail — I justify it to myself by saying that they'd be covered in crud anyway.
While dry-brushing excells at bringing out the highlights, ink-washing is used to enhance shadow detail.
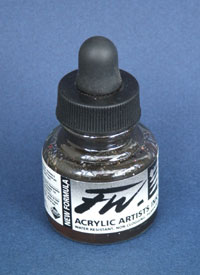
The mixture I use for the wash consists of
The amount of ink you add is a matter of personal preference, but it shouldn't be so much that it leaves much colour over the highlights of the model. I generally prefer to use Sepia ink rather than black because it doesn't create as harsh and artificial a tone. I've seen dark green used to good effect on all-green paint jobs, but I don't use it myself.

The ink-wash is brushed over the model using a fairly small brush — I use a synthetic Number 1. You want to allow the wash to build up in the crevices and hollows, but flow off the raised detail
I normally do two coats of the wash; the first just an all-over wash, and the second to pick out any areas I want to be more heavily shadowed.
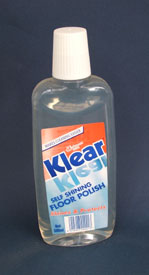
Unless you seal the paintwork beforehand, an ink-wash will darken your underlying colours slightly. As long as you don't go overboard with the ink in the mix it's not usually a huge problem, but it's something to be aware of.
NOTE: I've found it works best to drybrush first, then wash. The "Klear" seals the paint with a slightly glossy sheen which makes dry-brushing more difficult. We'll take care of that sheen later with a proper matte varnish.