

Stage 1: Model preparation
Stage 2: Mounting models for painting
Stage 3: Base-coating
Stage 4: Camouflage
Stage 5: Bringing out the detail
Stage 6: Markings
Stage 7: Protecting the paintwork
Stage 8: Basing
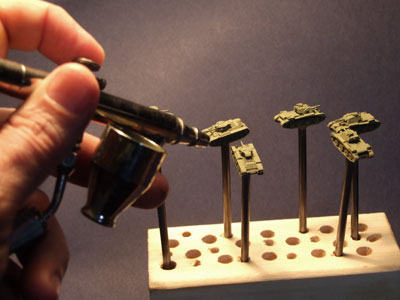
I always do the base coat with an airbrush if possible.
My favourite paint brand for spraying is Tamiya matte acrylic, well thinned with their proprietary brand of thinners (though isopropyl alcohol does a reasonable job). One huge advantage of using acrylics is that an additional undercoat isn't necessary; the paint doesn't attack bare metal the way that some enamels do, so the base colour can be our undercoat.
In the image to the right I'm actually using a mix of Vallejo 886 Green-Grey and Badger Air-Opaque Warm Yellow to get a colour vaguely like the Light Bronze Green used by the B.E.F. in 1939-40 — it sprays quite well just thinned with water, but it doesn't dry as fast as alcohol-thinned paint so you need to take a little more time between coats. I understand that Vallejo also make a proprietary thinner for their paint range, but I haven't yet tried it.
To get the best, most even finish with an airbrush, you need to lay the paint on in several thin coats rather than one thick one. If you spray on too much paint at once, it's likely to build up in the hollows (which will obscure fine detail) and form runs and drips. It doesn't take long for a mist-coat to dry off enough for the next coat though; by the time I'd done all six of these tanks the first was ready for its next coat.
Although all the detail is clearly visible through the paint when you look closely, from more than a foot ot two away the models look very flat. These small-scale models need a little extra help to bring out their form, which we'll take care of at a later stage with washes and dry-brushing to create exaggerated shadows and highlights.
There are some who like to bake their models in a low oven (about 120°C for half an hour or so) to cure and harden the paint, but frankly I haven't found much benefit from it. It may be different if I was using enamels rather than acrylics.
If you don't have access to an airbrush (and you really should get one if you possibly can) you can still get a reasonable base coat with a brush.
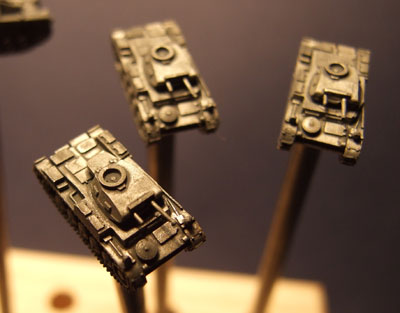
The Panzer IIs shown here to the left are in the initial stages of base-coating with Tamiya XF63 (German Grey), very well-thinned with Tamiya acrylic thinner. This is really just a wash, running the very thin paint into all the little nooks and crevices to make sure that nothing is missed — a stark bright spot of bare metal will stand out surprisingly strongly on the finished model.
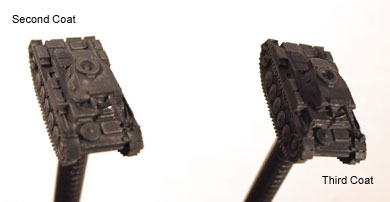
The base colour is built up with another couple of coats, again of well-thinned paint so as not to obscure any more detail than you absolutely must. The paint should flow very freely, but not be quite as thin as the initial wash. You'll probably need a couple of coats at least, depending on the colour — some pigments are more opaque than others. In the image to the right, we see the state after the second and third coats — it could probably do with one more, but I don't want to build up the paint too heavily at this stage.
Brushing will never give you as even a coating as spraying, but with care you can get an acceptable result. It's a lot slower than airbrushing though, even taking into account the time you have to spend cleaning and maintaining an airbrush.